
Feed aggregator
Top 10 Machine Learning Applications and Use Cases
Without requiring explicit programming for every situation, machine learning is a potent method in computer science that teaches systems to identify patterns and gradually enhance their performance. These systems are not an assemblage of rigidly set rules-they take data, predict an outcome, and change their course of action depending upon what they have learned.
Machine learning stands out as a significant technology due to its flexibility.
Machine learning thus stands as one of the major technological developments. It enables a machine to learn from data and improve with experience, without explicitly being programmed. Patterns discovered by machine learning models from data are used for forecasting or decision-making. Machine learning help companies automate processes, make better decisions, and glean insights. Machine learning is transforming industries worldwide from personalized content recommendations to breakthroughs in medical diagnostics. Some of the top 10 machine learning applications and use cases shaping the world today.
- Personalized Recommendations
A number of recommendation engines nowadays are created by online retailers and streaming sites that, depending on such data as location and past activity.
Machine learning lends to recommendation engines that suggest product, movie, or music according to past behavior of the user. Systems work on collaborative filtering, content-based filtering, etc.-methods of personalizing one’s experience.
Use Case:
Netflix recommends shows and movies based on what you have enlightened, whereas Amazon recommends items that are frequently purchased together.
- Fraud Detection
Banks use ML in real time to detect and prevent frauds. They work by analyzing patterns and variations in normal transaction behavior so that banks and credit card companies could detect suspicious activities concerning money laundering or unusual spending conduct.
Use Case:
Mastercard, for instance, uses AI to detect possible frauds in real-time and, under some circumstances, even predict some before they occur to protect a customer from theft.
- Predictive Maintenance
Machine learning is widely used in industries to forecast equipment failure before it actually happens. From an analysis of sensor data, such models forecast maintenance requirements for machines, thereby reducing downtime and saving costs.
Use Case:
Airlines keep track of engine performance to schedule repairs proactively.
- Healthcare & Medical Diagnosis
ML allows doctors to diagnose diseases faster and more precisely. It analyzes medical imaging or patient records to detect conditions early, such as tumors or diabetes. Tools are increasingly in use to recommend personalized treatments. Machine learning anticipates interactions between various substances and thus helps to speed up the drug discovery process and cut down on research expenses.
Use Case:
AI imaging systems to spot tumors in X-rays or MRIs, predictive models to identify patients at risk of diabetes.
- Autonomous Vehicles
Machine learning interprets sensor data, does object recognition, and cultivates decision-making scenarios for a closed-loop system for self-driving cars. Private entities such as Tesla and Waymo employ computer vision and reinforcement learning to drive autonomously and provide an autonomous ride service.
Use Case:
Tesla Autopilot applies deep learning for semi-autonomous driving including features such as lane keep assistance and adaptive cruise control.
- Natural Language Processing (NLP)
NLP enables machinery to understand, interpret, or generate human language. It is employed in chatbots, voice assistants, sentiment analysis, and translating tools.
Use Case:
For instance, GPT-based models can write essays, summarize articles, or answer questions with human-like fluency. NLP bridges the gap between human communication and machine understanding.
- Facial Recognition
The most important thing that machine learning can help facial recognition systems do is to identify individuals. Machine learning is a technique that enables images and videos to be identified and classified.
Use Case:
Used widely in smartphones for unlocking purposes, and airports for security checks as well as by law enforcement agencies, it is, however, very controversial in terms of ethics, privacy, and surveillance.
- Sentiment Analysis
The other important application of machine learning is sentiment analysis conducted on social media data. Sentiment analysis in real-time determines the feelings or opinions of a writer or speaker.
Use Case:
The sentiment analyzer can quickly provide insight into the true meaning and sentiment of a published review, email, or other documents. This sentiment analysis tool can be used for decision-making applications and for websites that provide reviews.
- Spam Filtering and Email Automation
ML is used by email services for message categorization and spam detection. These are models that learn from user behavior and content of a message to distinguish genuine emails from junk. This saves time and keeps users safe from scams.
Use Case:
Email platforms like Gmail, Outlook, and Yahoo manage inboxes, automating responses and filtering out unwanted messages with high precision.
10. Social Media OptimizationML is used by social media companies to target advertisements, identify hazardous content, and curate content feeds. The content-feed is algorithmically curated with the consideration of user engagements, and the same engine judges the advertisement placements. This keeps the user hooked-but it also creates discourse on algorithmic bias and user mental health.
Use Case:
Machine learning is employed by social media platforms like Facebook, Instagram, and Twitter to provide the best user experience by curating personalized content, targeting advertisements, and restraining harmful posts.
Conclusion:
Machine learning has come to revamp industries in the way that it provokes smarter decisions, smarter experiences, and smarter predictions. From healthcare to finance to social media, machine learning inhabits the very core of how people live and work. And as implementation increases, so does the need for ethical and responsible use in making sure that these powerful benefits are distributed fairly.
The post Top 10 Machine Learning Applications and Use Cases appeared first on ELE Times.
Turn pedals into power: A practical guide to human-powered energy

With a pedal generator, you can turn human effort into usable energy—ideal for off-grid setups, emergency backups, or just a fun DIY project. This guide gives you a fast-track look at how pedal generators work and how to build one on your own. Let’s turn motion into power!
Pedal generators, also known as pedal power generators, convert human kinetic energy into usable electrical power through a straightforward electromechanical process. As the user pedals, a rotating shaft drives a DC generator or alternator, producing voltage proportional to the speed and torque applied. A flywheel may be integrated to smooth out fluctuations, while a rectifier and voltage regulator ensure stable output for charging batteries or powering devices.

Figure 1 A commercial pedal generator delivers power through a standard 12-V automotive outlet. Source: K-Tor
Below is the blueprint of a basic pedal-powered generator built around a standard bicycle dynamo (bottle dynamo). It produces electricity as you pedal—using either your legs or arms—which can be used to charge small batteries or power portable electronics.

Figure 2 This blueprint illustrates how a basic pedal-powered generator works. Source: Author
It’s worth noting that a quick test was performed using the L-7113ID-5V LED as the test lamp/minimal load. Although overall efficiency varies with load and pedaling cadence, the system provides a hands-on demonstration of energy conversion ideal for educational setups.
Chances are you have already spotted that a DC motor can also function as a generator and that DC motors specifically designed for that purpose are now readily available. Below is a bit-enhanced version of the pedal generator built around a compact three-phase brushless DC (BLDC) motor.

Figure 3 A modestly upgraded pedal generator built around a three-phase brushless DC motor supplies unfiltered DC voltage for further conditioning. Source: Author
Just a quick note: If you are using a linear regulator, the small forward voltage drop you get from a Schottky diode (usually just a few tenths of a volt) does not really move the needle on efficiency. That’s because the regulator itself is dropping a lot more voltage across its control element. Where it does matter is when you are working with a low-dropout (LDO) regulator and trying to keep the output voltage as close as possible to the raw DC input. In that case, every little bit helps.
Also, it’s worth noting that readily available three-phase AC micro-generators can serve as viable substitutes, assuming they match your system’s specs. A typical example is the CrocSee Micro 3-phase brushless AC generator (Figure 4).

Figure 4 The micro generator’s internal view shows how elegant engineering simplifies complexity. Source: Author
To set expectations, pedal power is not sufficient to run an entire house, but it can be surprisingly useful. You can generate electricity for powering small devices and recharging batteries, all while using them. Pedal-powered generators can also work in tandem with other renewable sources, such as solar, to create a more versatile and sustainable setup.
On a related note, a pedal-powered bicycle generator (bike generator) is a practical solution that doubles as both an energy source and an exercise machine for household use. There are many ways to build a household bicycle generator, each offering its own set of advantages and trade-offs. Fortunately, even with basic tools and skills, constructing a functional bicycle generator is relatively straightforward.

Figure 5 A simple drawing shows how a household bicycle generator turns pedaling into electricity using a PMDC motor and a friction roller. Source: Author
Keep in mind that a flywheel can be a crucial component in this setup, as the dynamics of pedaling a stationary bicycle differ markedly from those of riding on the road. The flywheel helps smooth out the mechanical input, making the energy conversion process more consistent.
To convert this mechanical energy into electricity, a collector motor (Permanent Magnet DC Motor) serves well as a generator, offering reliable performance and simplicity. Alternatively, you can use a bicycle hub dynamo instead of the collector motor, but this demands some expertise.
Since the flywheel contributes to maintaining a relatively steady voltage output, it’s often feasible to run certain appliances directly from the generator, especially those that can tolerate raw, unregulated voltage. However, electronic devices and batteries are more sensitive to voltage fluctuations. Without proper regulation, they may malfunction or suffer damage, making a voltage regulator or controller a crucial addition to the system.
For a DC output pedal generator, such as the bicycle generator discussed here, a shunt regulator is the more suitable choice. Its ability to clamp excess voltage and safely dissipate surplus energy provides a critical layer of protection that a series regulator simply does not offer. Given the variable and often unpredictable nature of human-powered generation, overvoltage is a real concern, and the shunt regulator is specifically designed to handle this risk.
While a series regulator may offer slightly better efficiency under full load, its inability to manage voltage spikes or operate reliably without a constant load makes it less appropriate for this kind of setup. In contrast, the shunt regulator delivers consistent performance and robust overcharge protection, making it the safer and more practical option for a simple pedal generator system.
Additionally, in certain low-voltage, low-current systems that harvest energy from kinetic sources, pulse frequency modulation (PFM) modules can efficiently manage both power storage and delivery. These modules are particularly useful when energy input is sporadic or minimal, helping to optimize performance in compact or intermittent-generation setups.
Many folks working with motors might be surprised to learn that both brushed DC motors and brushless DC motors can actually function as generators. A brushed DC motor is a solid choice when you need a DC voltage output, while a BLDC motor is better suited for generating AC. If you are using a brushless DC motor to get DC output, you will need a rectifier circuit. On the flip side, if you are trying to get AC from a brushed DC motor, you will need DC-to-AC conversion electronics.
Moreover, it’s often assumed that a brushed DC motor running in generator mode is far less efficient than when it is driving a load as a motor. But with the right motor selection, load matching, and operating speed, you can achieve surprisingly good efficiency. Just be sure to consider both electrical and mechanical factors when dialing in your operating conditions.
See below a simplistic system diagram of a practical pedal power generator.

Figure 6 Here is a system diagram of a pedal generator that helps you build your own version. Source: Author
The core principle is straightforward: the raw input voltage (VT) is continuously monitored and compared against a stable reference voltage (VR). When VT exceeds VR, a power MOSFET activates the dump load, which must be capable of safely dissipating the excess energy.
Conversely, when VT falls below the reference, the dump load is deactivated. To prevent rapid switching near the threshold, it’s advisable to incorporate a small amount of hysteresis into the comparator circuit.
Now it’s over to you; review it, experiment, and bring your own version to life. Keep pedaling forward!
 T. K. Hareendran is a self-taught electronics enthusiast with a strong passion for innovative circuit design and hands-on technology. He develops both experimental and practical electronic projects, documenting and sharing his work to support fellow tinkerers and learners. Beyond the workbench, he dedicates time to technical writing and hardware evaluations to contribute meaningfully to the maker community.
Related Content
- Energy harvesting
- TEG energy harvesting: hype or hope?
- Bike2: A Novel Powertrain for Electric Bikes
- An Energy-Harvesting Scheme That Is Nearly Useless?
- Energy Harvesting: Maybe Electricity Can Grow on Trees?
The post Turn pedals into power: A practical guide to human-powered energy appeared first on EDN.
Двоетапна перевірка діяльності КПІ ім. Ігоря Сікорського

Нещодавно у КПІ ім. Ігоря Сікорського завершилася комплексна двоетапна перевірка діяльності, ініціатором якої є адміністрація університету.
First Project: Bluetooth Speaker
 | Hey all! This is my first project and my first post here. I know it's a simple project, but I'm still really proud of how it turned out and wanted to share. My friend and I are making a Bluetooth speaker for calls. Unfortunately, we assumed that audio was audio, so any audio amp would work for calls, but turns out different amps are needed for calls so all I could play on this one was music. First, I put it all together with the breadboard and tape, and it was working but the signal was sparce, owing to loose connections with tape. So, I decided to solder the connections for a more continuous signal. These are standard jumper wires from an Arduino starter kit; I presume you're not really supposed to solder them. But this was a throwaway prototype, I had plenty of wires, and I wanted to get experience soldering quickly, so I just did it and tried to desolder them afterward. All in all, considering this was my first time soldering and I only burned myself once, I'm prepared to call this a success. I know this setup doesn't look very safe; it was all done very impromptu. My friend probably has a better setup, but he wasn't available, so next time I'd like to do this at his place. If I keep doing this on my own, I'll go outside until I get a better setup. Video Link: https://imgur.com/a/OUeYEi9 Song: Can You Hear the Whistle Blow by Default (缺省) 缺省 Default - Can You Hear The Whistle Blow (Official MV) Components: XJ8002 Power Amplifier: 10PCS/LOT HXJ8002 Power Amplifier Board Mini Audio Voice Amplifier Module Replace PAM8403 - AliExpress 502 Breadboard, jumper wires, & 1k ohm resistors from REXQualis Starter Kit for R3 Project: Amazon.com: REXQualis Super Starter Kit Based on Arduino UNO R3 with Tutorial and Controller Board Compatible with Arduino IDE : Electronics [link] [comments] |
My hand is cursed (rant)
") | im not sure if this is allowed to be posted here, just scrolling and deleting pics from my phone and i found old pics of my uni class works and projects that somehow went wrong so often while i did nothing wrong. im pretty confident with my wiring and building the circuit because i used to be doing all good with correct results, but in my third year things just gone weird on my hands. i have officialy broken THREE breadboards and TWO arduino uno boards. context behind the second pic; i was building the circuit on the textbook but halfway through when i inserted a new jumper wire to ground row it sparks. no electric source, all machines were off. i told the lab assistant about my problem and he didnt believe it until he did what i did. in the end he just told me to buy a new breadboard. whenever i retold this story to my seniors or friends from the same major, they kept on telling me "stop making up weird stories, i had my breadboard since high school", "did you break the arduino board in half? that thing is impossible to break", yada yada yada. the project with arduino one was very important to me since it's a mandatory final project. even the simplest command would went wrong while there was nothing wrong physically, like the wrong LED lit up while it's not connected to the wiring i was testing, got 100% sensor reading while i didnt expose the sensor to anything yet, and the most frustrating was how often it sent me failed uploading message even if i have reset it, change the wires, clean the ports, multiple times. D-1 presentation morning everything finally worked but it had to be run separately (i used 3 sensors) so i quickly documented everything for the ppt attachments, but holy shit that evening it wouldnt let me run it again. so i ended showing up only with my poster and ppt (the paper was submitted via web). honestly im still very thankful that presentation was not graded, just need to show up and present it to the guests. it's just a mandatory project for the semester with progress reports every week and my professor said to not think about it too much, since he saw every weird shit from my project (he is also a very nice person as well). i could still remember showing up for the biweekly progress presentation just to show the video of me trying to show the sensor reading but it came out all different in multiple attempts and got stared by my project mate (1 professor could take 5 groups of students, i just volunteered to do the project alone since im an international student and i tried to avoid any miscommunications). that was the last time i touch any hardwares, not graduated yet since i failed a lot of classes which makes me wonder if this 4 years of uni actually worth the struggle. thanking everyone that read this until the end. [link] [comments] |
Estimating FM Bandwidth: Solved Examples
LBN head it's old
 | Hi, [link] [comments] |
Paripath Inc. - Negative delays aren't so negative after all !
 | submitted by /u/1Davide [link] [comments] |
Weekly discussion, complaint, and rant thread
Open to anything, including discussions, complaints, and rants.
Sub rules do not apply, so don't bother reporting incivility, off-topic, or spam.
Reddit-wide rules do apply.
To see the newest posts, sort the comments by "new" (instead of "best" or "top").
[link] [comments]
EEVblog 1700 - Do Dumpster LCD TV's Make Good LED Light Panels?
Veeco’s Q2 revenue, operating income and EPS exceed guidance, but constrained by tariffs
Renesas Intros 64-bit MPU Aimed at AI-Centric High-Performance HMI Designs
DMM Plug-In Test Resistor with temperature sensing

Proper precision calibration resistors are expensive and usually bulky, often in a large box or can. These are overkill for low-cost handheld digital multimeters (DMMs) and LCR Meters, especially when used as a “sanity check” before making critical measurements.
Wow the engineering world with your unique design: Design Ideas Submission Guide
Most of the time, I would use a precision axial-leaded resistor for this purpose. Still, I thought about making something more convenient that provided the precision resistor with some mechanical protection to directly plug into a DMM or LCR meter. If using a high-resolution bench DMM like a Keysight KS34465A or Keithley DMM6500, often you want to know the resistor temperature as well as the resistance value, and the thought came to thermally link the precision resistor with a precision thermistor for this purpose. In the spirit of low-cost DIY, the idea to link the axial-lead precision resistor with an axial-lead precision thermistor with a short section of heat shrink tubing seemed reasonable, and you can’t get much simpler or cheaper than the concept shown in Figure 1!
 Figure 1 Linking an axial-lead precision resistor and an axial-lead precision thermistor with a short section of heat shrink tubing.
I still needed mechanical protection for the resistor/thermistor combo, and how to make direct DMM connections. A standard dual banana plug is a good host for the combo, but only has two connection terminals. Using a 3D printer, I created a custom 3D printed “plug” to support the thermistor leads as shown in Figure 2.

Figure 2 A custom, 3D-printed “plug” supports the thermistor leads, allowing for a resistor/thermistor combo with mechanical protection.
Figure 3 shows the resistor/thermistor combo mounting scheme, where the precision axial resistor leads are inserted into the dual banana plug holes and secured by the plug’s internal screws (leave some slack in the resistor leads to help reduce mechanical stress on the precision resistor). Note how the resistor lead ends are looped over, creating small terminals for external “clip lead” or “Kelvin clips” measurements. The axial thermistor leads are threaded through the custom 3D printed plug and loop at the top.

Figure 3 The resistor/thermistor combo mounting scheme, where the precision axial resistor leads are inserted into the dual banana plug holes and secured by the plug’s internal screws.
Overall, the concept creates a small compact holder for the precision resistor and thermistor combo with convenient connections to the resistor measurement instrument directly by the dual banana plug. Temperature measurements use small clip leads to the thermistor leads, which protrude from the top of the dual banana plug and a custom 3D printed plug top, as shown in Figure 4.

Figure 4 A resistor temperature reading showing the small clip leads to the thermistor leads, which protrude from the top of the dual banana plug and custom 3D printed plug.
When using this setup, I found the bench-type DMMs like the DMM6500 have banana input terminals 3~3.5 °C warmer than ambient (the KS34465A was 2~3 °C warmer). This helps explain the long settling time for bench DMM new banana connections to stabilize, where differential thermal EMFs can corrupt sensitive measurements. Handheld DMMs seem to stabilize much quicker since the internal handheld temperature is slightly above ambient, whereas the bench DMMs are much warmer.
Anyway, I hope some folks find this DIY Precision Resistor with built-in thermistor concept convenient and useful, although wouldn’t recommend this for precision resistors below ~100 Ω, this is 4-wire Kelvin territory, and certainly not considered “Metrology Qualified.”
Michael A Wyatt is a life member with IEEE and has continued to enjoy electronics ever since his childhood. Mike has a long career spanning Honeywell, Northrop Grumman, Insyte/ITT/Ex-elis/Harris, ViaSat and retiring (semi) with Wyatt Labs. During his career he accumulated 32 US Patents and in the past published a few EDN Articles including Best Idea of the Year in 1989.
Related Content
- Simple 5-component oscillator works below 0.8V
- Injection locking acts as a frequency divider and improves oscillator performance
- Investigating injection locking with DSO Bode function
- DIY custom Tektronix 576 & 577 curve tracer adapters
The post DMM Plug-In Test Resistor with temperature sensing appeared first on EDN.
Sivers Semiconductors appoints Heine Thorsgaard as CFO
Lumentum expanding ultra-high-power laser production in San Jose
Спільний проєкт з Київським метрополітеном «Метро. Місто. Політехніка»

Запрошуємо переглянути цікаві інформаційні плакати у спільному проєкті з Київським метрополітеном «Метро. Місто. Політехніка» щодо важливих інженерних рішень у київському метрополітені, які були впроваджені за участі фахівців з КПІ (зокрема, щодо будівництва станції «Політехнічний інститут»).
Trump Plans to Impose 100% Tariff on Computer Chips, Likely Driving Up Electronics Prices
President Donald Trump announced plans to impose a 100% tariff on computer chips, which would certainly increase the price of gadgets, cars, home appliances, and other items considered necessary for the digital age.
Speaking from the Oval Office alongside Apple CEO Tim Cook, Trump said, “There will be a tariff of approximately 100% on chips and semiconductors. In order to increase the company’s domestic investment commitment and possibly avoid future iPhone levies, Trump also declared that Apple would invest an additional $100 billion in the US.
However, companies that manufacture semiconductors within the United States would be exempt from these tariffs.
Effect Across Industries
Chips for computers are the crucial element in question. For consumer gadgets, cars, home appliances, and industrial systems, that is the solution to the usage of current technology.
Shortages of chips in the middle of the COVID-19 pandemic caused inflation in prices and disruptions in the supply chain. Global chip sales have grown by 19.6% over the past year, indicating strong demand.
Trump’s approach deviates from the CHIPS and Science Act’s deliberate approach. The law was signed in 2022 by President Joe Biden with a promise of $50 billion worth of subsidies, tax breaks, and research funding for domestic chip production.
Conclusion:
While it is meant to strengthen U.S. manufacturing, many critics warn that this policy might backfire. Hence, as chips cost more, profits get thinner while companies hike consumer prices. No official word has so far come from these titans of electronics, Nvidia and Intel, concerning the announcement.
The post Trump Plans to Impose 100% Tariff on Computer Chips, Likely Driving Up Electronics Prices appeared first on ELE Times.
eDesignSuite Power Management Design Center: 3 new features and a ton of possibilities
By: STMicroelectronics
eDesignSuite Power Management Design Center is more than just a new console, but a new way to choose more responsible products, simulate higher loads, and shave weeks off the design phase of power circuits. The suite includes a power supply and LED lighting design tool, a digital workbench, and a power tree designer. Concretely, ST is now supporting 30 kW applications, and users can expect support for even greater power solutions as we update our web application. Put simply, engineers have access to new customization and simulation capabilities, which expand the scope of the Power Management Design Center and lower the barrier to entry for power application design.
eDesignSuite Power Management Design Center: New console Screenshot of eDesignSuite Power Management Design Center
Users will instantly be familiar with the new console of the Power Management Design Center because it remains extremely close to the version ST launched when we moved to HTML 5. After all, its intuitiveness is a key component for engineers working on complex power applications. What has primarily changed is that we are now offering the ability to highlight devices considered “responsible”, meaning they enhance energy efficiency. Behind the scenes, it required us to create new categories and labels, update our databases, and determine which devices would have the most significant impact on a design. For users, all it takes is a single click to know how to optimize their design meaningfully.
And this is just the beginning. We are already working on providing impact simulations to ensure designers can concretely see how choosing a responsible device affects their design. Too often, engineers recognize that a gain of just one percentage point in efficiency can make a significant difference. Unfortunately, communicating this fact can be as tricky. That’s why we are working to make eDesignSuite a scientific witness of what it means to design with responsible solutions, such as helping determine the amount of greenhouse emissions saved and other real-world environmental benefits. In a nutshell, we are taking the simulation engine that has made eDesignSuite so popular and using its rigorous models to make “responsible” a lot more tangible.
New topologiesThe Digital Workbench in eDesignSuite Power Management Design Center got support for new topologies that primarily focus on energy storage. Interestingly, some topologies exhibit bidirectional behavior, playing a crucial role in designing systems that not only supply power to battery chargers, such as those in electric vehicles, but also enable power to be fed back to the grid or homes, as seen in Vehicle-to-Grid (V2G) and Vehicle-to-Home (V2H) applications. These new topologies are especially promising when working with gallium nitride or silicon carbide. Their arrival in Digital Workbench means that engineers can now use our wizard to expedite their development and more accurately size the other components of their design, among other benefits.
ST will continue to innovate by introducing advanced topologies. Recently, we launched a 7 kW two-channel multilevel buck converter and a 10 kW two-channel multilevel boost converter, both featuring Maximum Power Point Tracking (MPPT), which aids in designing for solar applications. Indeed, as solar energy is a volatile source due to frequent fluctuations caused by the sun’s movement or clouds, it is imperative to track these changes to optimize power conversion. That requires an MCU like the STM32G4 and a topology capable of handling these constraints. By offering such new topologies in Digital Workbench, engineers can significantly reduce their time-to-market.
New electro-thermal simulationThe fact that we are supporting new topologies and offering a new console highlights the unique demands engineers are facing. As markets require more efficient systems, simulations are ever more critical. That’s why eDesignSuite also got a new electro-thermal simulator, the so-called PCB Thermal Simulator. In a nutshell, it opens the door to temperature analysis based on the electrical performance of a PCB by simply analyzing Gerber files.
Specifically, by using a precise thermal model and iterative calculations, the ST PCB Thermal Simulator quickly and precisely estimates temperatures on both sides of the board. It can also simulate inner layers and allows manual or automatic placement of heat sources (custom or predefined devices), heat sinks, copper areas, and thermal vias. Simulation results are displayed as colored maps overlaid on both sides of the board. Users can inspect any point for temperature values and export results as CSV files. Hence, while the first applications of the electro-thermal simulator primarily focused on motor control, others are now starting to adopt the technology, and we are ensuring that more industries can benefit from it.
The post eDesignSuite Power Management Design Center: 3 new features and a ton of possibilities appeared first on ELE Times.
India’s Electronics Industry Booms with 127% Export Growth in Mobiles
Over the last decade, the electronics manufacturing sector in India has undergone a massive transformation to become a great production center. The sector has witnessed immense growth, both in terms of output and exports, due to some strategic government measures and the rise in foreign investment.
Creating quite a buzz in 2014 was a relatively modest electronic labor market in India, while now, by 2025, it has transformed into a full-blown ecosystem. The value of electronic products made has multiplied six times, and exports have increased eightfold, all pointing toward the enhanced global competitiveness of the sector.
Mobile Manufacturing takes center stage, the mobile segment has witnessed the explosive growth. While in 2014, there were only two manufacturing units, now India has 300 manufacturing facilities. Production has ascended from ₹18,000 crore to ₹5.45 lakh crore, and exports have increased from ₹1,500 crore to ₹2 lakh crore, that is 127% growth.
Policy Reforms:
The government-led PLI scheme is one of the aspects that contributed to this change. The scheme takes in investment upward of ₹13,000 crore and causes production of nearly ₹8.57 lakh crore, as well as creation of more than 1.35 lakh direct jobs. The scheme’s impact on international trade is demonstrated by the ₹4.65 lakh crore in export data.
Inflows of FDI and Semiconductor Push
The Semicon India programme being carried out under six projects is undergoing investments of more than Rs 1.55 trillion and is expected to create over 27,000 direct jobs and build a solid chip-making ecosystem.
Foreign direct investment into electronics manufacturing has now crossed $4 billion since FY21, and around 70% of this inflow is linked to PLI beneficiaries. This is the investing community`s vote of confidence.
With a budget of ₹22,919 crore, the Electronics Components Manufacturing Scheme (ECMS) was introduced with the goal of increasing domestic capabilities and decreasing reliance on imports.
It is purported that one direct job in electronics sector results in three indirect jobs, thus substantially contributing to the broader socio-economic impacts in the country.
Conclusion:
India’s electronics rush is not just numerically driven, but strategically poised for attaining self-reliance and global influence and technological leadership. With this momentum intact, the country is moving to become a major force in the global electronics supply chain.
The post India’s Electronics Industry Booms with 127% Export Growth in Mobiles appeared first on ELE Times.
Machine Learning Architecture Definition, Types and Diagram
Machine learning architecture means the designing and organizing of all of the components and processes that constitute an entire machine learning system. The ML Architecture lays down the framework to design machine learning systems, indicating how data is to be handled, models to be built and analyzed, and predictions to be made. Depending on the particular use case and the set of requirements, the architecture can vary.
A highly scalable and performant machine learning system can be realized through proper architecture.
Types of Machine Learning Architecture:
- Supervised Learning Architecture Unsupervised Learning Architecture
By definition, Supervised Learning uses labeled data to train models: this means each input has a corresponding correct output value. The supervised learning architecture begins with gathering the datasets-full labeled, then undergoes Data Preprocessing to make sure the labels match up with the inputs correctly. Afterward, with the data ready, it proceeds to training it with the algorithm, like Linear Regression, Logistic Regression, SVM, or Random Forests. This method is very suitable when making predictions like: House Price Predictions, Email classifications as Spam or Not Spam, Medical diagnoses based on test results. Supervised learning’s primary benefit is its excellent accuracy when given clean, properly labelled data. It necessitates a lot of labelled data, though, and its preparation can be costly and time consuming.
- Unsupervised Learning Architecture
In unsupervised learning, unlabeled data is used. Hence, the system tries to find the patterns or the clusters without much explicit guidance. Data acquisition for this architecture is more flexible because no labels are required. Preprocessing, however, serves a vital purpose in ensuring the data is consistent and meaningful. Algorithms used in unsupervised learning include K-Means Clustering, Hierarchical Clustering, and PCA. This approach is applicable in customer segmentation, anomaly detection, or market basket analysis. The biggest attraction for unsupervised systems is that they work on data that is generally easier to come by. But since results fundamentally depend on pattern discovery, interpretation of such results may require domain knowledge.
- Reinforcement learning
Reinforcement learning is based on the principle of learning through the interaction with an environment. The architecture is designed to have a setting representing the environment, where a model will choose an action and get feedback on that action being rewarded or penalized. This feedback interchanges are insect within the structure that meanwhile allows model improvement from trial and error. Some popular algorithms are Q-Learning, Deep Q-Networks (DQN), and Policy Gradient methods.
Reinforcement learning finds its way into robots, game AI, and autonomous systems. Its strongest suit is adapting to a dynamic environment wherein the reward is a function of a series of other actions. Hence training can take ages and require a lot of computing power.
Machine Learning Architecture Diagram:
An overview of the many different parts required to create a machine learning application is given by a machine learning architecture diagram.
Simple Machine Learning Architecture Diagram:
Explanation of the Machine Learning Architecture Diagram:
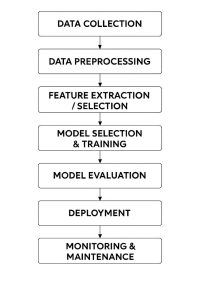
The diagram outlines the step-by-step process of building and running a machine learning system.
- Data Collection – It helps to treat data as raw material that comes to the project from some arbitrary source like a data base, sensor, API, or web scraping.
- Data Preprocessing – Raw data are often incomplete or inconsistent. In this stage, the data are cleaned and formatted and then prepared so that the model understands them. This is a stage of utmost importance for accuracy.
- Feature Extraction / Selection – Some data is never as useful as others. Herein, the most important variables (features) that determine predictions are picked and retained while other ones that are irrelevant are discarded.
- Model Selection & Training – The type of problem being solved will determine the algorithm choice; the model is then fitted with the historical data to learn patterns and relationships.
- Model Evaluation – The model is tested on new data to assess its accuracy, efficiency, and ability to make real predictions.
- Deployment – Once the model works fine, it is incorporated into a live application or system for real-time prediction or decision-making.
- Monitoring & Maintenance – The model goes through performance tracking as time passes by. It shall be updated or re-trained every time its accuracy is compromised due to real-world data change.
The feedback loop often sends the process to the earlier stages due to new data, ensuring the improvement of the model all the time.
Conclusion:
Machine Learning architecture is more than just a technical plan it is a backbone that decides how well an ML system learns, adapts to changes, and gives out results. A bad architecture disrupts data flow, creates delays in training, and compromises the reliability of predictions over time. Properly-designed ML architectures can be used by businesses and researchers to address problems accurately and at scale. As data grows and technologies evolve, these architectures shall continue to be the power that fuels innovations that re-shape industries by helping people make better decisions while changing everyday life.
The post Machine Learning Architecture Definition, Types and Diagram appeared first on ELE Times.
Pages


![[link]](https://i.redd.it/fme29jvyp2if1.png)